Nail Polish from Claire’s Changes


You have probably already heard about chameleon nail polish. Some fashion-lovers use them quite regularly. Those nail polishes change color depending on the angle of light. How about innovative nail polish, which changes color in response to your mood?

How would it determine the mood? Very easy – as the temperature of the environment or body changes the substance changes its color. Indeed, when we go outside we usually put on some outerwear and thus need different nail color to match it.

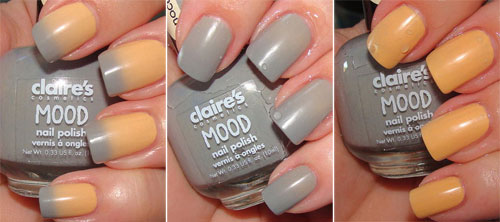
One of the most popular maker of such nail polish is the brand Claire’s. We present to your attention two versions of this moody-innovation. On the photos, the models put their hands in water for a reason. This way they were trying to capture color change by using cold water first and then changing to warm water.

Claire Mood Nail Polish Darling-Innocent

Under normal temperature the color of the nail polish will not look uniform because nails tend to have different temperature along their surface: colder at the tips and warmer where in contact with the body. Thus, we get interesting two-tone effect.

Perhaps we will soon have nail polish that changes in response to human voice or musical tone.

Split Ends


Split ends happen when the protective cuticle has been stripped away from the ends of hair fibers. To treat spilt ends, first trim off the ends of your hair to even length. Avoid back combing or use of spiky rollers. Split ends are more likely to develop in dry or brittle hair, and typical causes of damage include excessive dying or vigorous brushing. You could also use these other nourishing tonic application for your hair.

What are the causes of Hair split end

Over perming or colouring, insufficient conditioning, or too much brushing or backcombing, especially with poor quality combs or brushes. Careless use of spikly rollers and hair pins, excessive heat styling and not having the hair trimmed regularly can also cause the problem.

Here some home remedy or treatment to how to get rid of split end:-

PAPAYA PACK is natural care of hair split end

A unique, simple and easy remedy to bring your hair back to life. Take half of a ripe medium sized papaya. Slice after skinning and deseeding it. Put it in a blender and blend it to a pulp. Add half cup of yogurt and apply lavishly to your scalp. Part your hair at regular intervals and apply to hair strands and hair ends. Leave it on for 30 mintues. Rinse hair thoroughly with warm water

CREAM TONIC will cut down split end

After you shampoo your hair, use the following tonic: take half cup milk; add to this a tablespoon of cream. Beat it up. Apply on the scalp, hair strands and hair ends. Leave it on for 15 mintues. Rinse and wash well with water. This helps to get rid of split end.

HONEY will nourishes the hair split end hair

Take half a cup of curd. Add to this a table spoon full of honey. Mix well. Apply on the scalp and hair strands and hair ends. After 20 mintues wash with water. See a remarkable change in the sheen and smoothness of your hair.

BLACK LENTIL PACK to get rid of split end hair

Take half a cup of black dal ( lentil). Add one table spoon of fenugreek (methi) seeds. Dry grind to a coarse powder. Add half a cup of curd. mix well. Apply generously all over the scalp. Leave it for 2 hours. Wash your hair with water using a mild shampoo. This helps to get rid of split end.

Hair Partings


Hair partings are the focal point of a hairstyle. They should be neat and clean for a good appearance. If you are not careful on how to use a parting, it can enhance or mar the total look.

A hairstylist must always work according to the natural parting or a precise centre parting and natural hair stream for required flexibility, which is quite important in changing and maintaining a style. If you suggest to your client to change his parting, ask him to gradually shift the parting after every hair wash so that his hair gets adjusted over time. Sometimes, when styling according to the facial contour and texture, it is difficult to incorporate the natural parting in the style, it is advisable to keep changing the parting.

Finding the Natural Parting

Comb freshly shampooed hair back and place the right palm on the crown, pushing the hair forward slightly. The hair will separate at the natural part.

Types of Hair Partings

Partings must suit the facial contour and hide the facial flaws like imperfect features and defective growth pattern. Partings normally taken are:

1. Centre Parting

Centre parting is most suited on an oval face and gives an oval illusion to wide and very round faces. People with prominent noses and oblong faces should avoid centre parts. Always try to create a hairstyle that gives an optical illusion of ovalness to the face.

Centre Hair Parting

2. Side Parting

This is the most suitable to round and square faces that require height on top and heart-shaped faces that require decreased width of the forehead. It also makes thin hair appear fuller.

ide  Hair Parting

3. Diagonal Parting

Diagonal parting is used to give height to round and square faces. A truly asymmetrical element of hair design, the diagonal parting can be used to direct the amount of volume in the style in one direction or another. It is especially good for styles that want a wide sweep of hair in the foreground of the style. Diagonal partings are also used in many up-styles to hide foundational elements of the style and prevent 'holes' in the finished hair-do.

Diagonal Hair Parting

4. Zigzag Parting

Zigzag parting is suitable to all the shapes of the face. A zigzag parting does look best on hair that is dense on the scalp, because the denser the hair growth, the cleaner the partings will appear. For hair that is sparsely spaced on the scalp, consider the criss-cross parting. This allows you to create an illusion of more hair on the head without resorting to a 'puffed-up' style.

Zigzag Hair Parting

Shiny Hair


You can give your hair a great shine and help remove soap build up:

  • Blondes — Add a couple of tablespoons of lemon juice to your rinse water.
  • Brunettes and Redheads — Add a couple of tablespoons of apple cider vinegar to your rinse water.

Stir 1 teaspoon of honey into 4 cups (1 quart) warm water. After shampooing, pour the mixture through you hair. Do not rinse out. Dry as normal

Permanent Hair Removal


Electrolysis:

Electrolysis is a process of removing hair by the galvanic method (chemical means). The chemical substance formed at the tip of the needle permanently destroy the roots of the hair by electricity .

Thermolysis:

This is a relatively new method of removing hair. The process of hair removal is the same as electrolysis. The hair is destroyed by coagulating the papilla (the source of nourishment for hair through the use of heat.

Laser :

Light at a specified wavelength is delivered from a hand piece into the skin, where it targets dark material (usually the pigment in hair). This is intended to cause thermal and/or mechanical damage to a hair follicle while sparing surrounding tissues

Advantages of Permanent methods of hair removal.

  • This is the only real solution to excessive hair growth.
  • After every sitting the growth of hair becomes finer and eventually stops.
  • Fine hair requires very few removal sessions and gradually the hair growth stops.
  • Once the hair stops growing, it is forever.
  • Useful for large areas such as backs or legs.

Disadvantages of Permanent methods of hair removal.

  1. It is a very costly method of removing hair, specially when area of unwanted hair is to be treated.
  2. This method can be painful experience.A poorly trained electrologist can harm the skin by causing permanent scars end depressions.

  3. Improper treatment can cause burns, lesions, skin discoloration lasting several months, or patchy/patterned re growth.

Hair Oily


Oily hair is very fine in texture. It is easily affected by atmospheric pollution and needs to be shampooed and washed more often. If you have oily hair, then try and keep it covered when going out in the sun. Do not wash everyday. The cleaner your hair is the more it can seep into your glands and harder it is to get rid of.

Try to avoid conditioner at the roots, apply in the middle or on the ends. Diet too is important. Aviod fried foods and dairy products. Increase your intake of fresh fruits, green and leafy vegetables and salads. drink plenty of water.

There are several simple home remedy for to get oily hair rid.

ALMOND OIL AND WATER APPLICATION : Take a half cup water, add to this a teaspoonful of almond oil. Massage this into your hair half an hour prior to your bath. Shampoo and rinse off. Note, the massage is with oil and water emulsion. Do not use only oil.

LIME AND VINEGAR RINSE : Take a cup of warm water and add three tablespoons of vinegar along with the juice of the one lemon. Gently massage this mixture into your hair and scalp. Leave it on for 30 minutes. Wash and rinse with water.

COLOGNE RUB : Mix equal parts of any cologne and water. Use cotton wool to rub this mixture into fine parting of the hair . This lifts grease of the roots. Wash hair as usual.

APPLE AND VINEGAR RINSE : Grate one apple. Add to it half cup vinegar. Apply generously all over scalp and length of hair. Leave it on for 20 mintues, wash off, rinse thoroughly.

TEA RINSE : Make a tea rinse by boiling tea leaves in a water. Squeeze in juice of one lime. Strain and keep aside. After a shampoo use this rinse. Leave it for 20 minutes, wash off, rinse thoroughly.

BAKING SODA RINSE : The hair accumulates dirt very quickly. In addition, ther is a build up of shampoo and conditioner. it alters the alkaline (ph) levels, making the hair oily and limp. Here is a quick rejuvenation application. Take a tablespoon of baking soda, add to it 4 tablespoon of cider vinegar. Rub this your hair scalp, leave it on for 5-7 mintues and shampoo your hair. It comes squeaky clean, vivacious and buoyant.

Right Way to Shampoo your Hairs


Hair Shampoos are designed to cleanse the hair and scalp, removing dirt and grime without stripping away too much of the natural sebum. Clean shiny hair is seen as a sign of good health. One of the best shampoo types to use is a shampoo with a balanced P.H. value, these shampoo's will return your hair to its natural P.H. level and make manageability very easy. Choosing the correct shampoo and conditioner for your hair can be a matter of trial and error

How to properly shampoo your hair?

  1. First, select the correct shampoo for your hair type. If any doubt go for this Herbal Essence Shampoo.
  2. Then thoroughly saturate scalp and hair using warm or cool water (hot water tends to dry out hair and scalp) so warm water is preferable.
  3. Take a small amount of shampoo to palm and rub hands together to evenly distribute and rub on your scalp or hair.
  4. Now apply shampoo to scalp with the balls of your fingers. Continue this by gently massaging your head with your fingertips while shampooing.
  5. Gently rotate your scalp (not your hair) with circular movements, then work out your way to the ends, because this is the direction in which the hair cuticle lies.
  6. Rinse in cool water. It closes the cuticle and stimulates the scalp.

Now how to conditioning your hair.

  1. After rinsing shampoo, apply some conditioner in one hand and rub palms together to evenly distribute.
  2. Apply the conditioner from the middle of the hair shaft down to ends; do not massage conditioner.
  3. Leave conditioner on hair long to help smooth the cuticle for about 2 to 4 minutes.
  4. Rinse thoroughly with cool water.
  5. After rinsing, gently blot the hair dry with a towel - don't rub. Rubbing can weaken your hair.

Head Massage Tips


Indian head massage is the massage of the upper back, shoulders, neck, head and face. Indian head massage provide relief from aches and pains and stress symptoms, promote hair growth, soothe, comfort and re balance skin and provide a sense of deep calmness and tranquility. A good Indian head massage includes the use of special oils, which are also beneficial to hair growth.

Indian head massage helps in resorting the blood circulation, soothing nervous tension - which can contribute to hair loss - loosens dead skin cells, and helps redress the over production of sebum, which makes hair greasy. Contra-indication for scalp treatment:

  1. Head manipulation should not be performed before any kind of hair dye.
  2. Prior to permanent wave and straightening treatment.
  3. If there is any infection condition present in the head.
  4. Any type of head disorder.
  5. If there are scalp abrasions.

An Indian Head Massage generally starts with the client sitting in a comfortable chair for the duration of the massage. Indian head massage can release anxiety, help relieve mental tiredness and depression and can improve concentration and alertness. Once a massage has been complete the client should remain at rest for at least 20 minutes.

Methods of Indian head massage

  1. Relaxing Movement: Place your left hand under the chin and right hand at the base of the skull. Very gently rotate the head clockwise and anticlockwise while shifting your hand's position. Repeat 3 times.
  2. Sliding and rotating movement : Keep your finger - tips at the back of the head. Slide and rotate your finger while pressing the head. Repeat 6 times.
  3. Forehead Movement : Place your left hand at the back of the head and spread your right thumb and fingers on the forehead. Gently move your hand while pressing the frontal bore. Repeat 4-5 times.
  4. Head Movement : Place your plams above the ears and rotate firmly. Then change your plams position at the front and back of the head and repeat the movement 5-6 times.
  5. Hairline and Head Movement: Place the fingers of the both hands on the hairline. Massage while lifting and rotating the hairline and full head front and back.
  6. Ear Movement : Place left hand on the forehead and the heel of your right hand under the right ear. Massage in a continuous circular movement up to the left ear. Repeat 4 times.
  7. Neck Movements : Keep your hand on the forehead. Rotate your right hand firmly from the base of the neck and shoulder blades on the both sides. Repeat 2 times.
  8. Shoulder and Spine Movement : Keep your hands on the shoulders with your fingers firmly and in rotation. Gently massage the neck and spine applying thumb pressure in circular movement.

The all above Indian head massage is for us to give more conscious of life and to become aware of releasing tension and enjoying physical relaxation. Since this type of massage is said to improve nervous and eyestrain.The Indian head massage can be from 30 to 45 minutes and induces a wonderful feeling of calmness and well being. The massage is very relaxing and often relieves tightness around the neck and shoulders and can cure headaches caused by nervous tension. A good Indian head massage includes the use of special oils, which are also beneficial to hair growth. Blood circulation is increased and more oxygen is released to the brain, thus stimulating stronger powers of concentration and energy.

Head louse


Head louse infestations are a common problem in infants and children, even in those who practice good hygiene and frequent hair washing. Head Louse called Pediculus humanus capitis (peh-DICK-you-lus HUE-man-us CAP-ih-TUS), head louse are parasitic insects found on the heads of people. Having head louse is very common.

Head louse derive nutrient by blood-feeding once or more often each day, and cannot survive for more than a day or so at room temperature without ready access to a person's blood. Head louse are tiny brown and gray parasites that can cause itching and scratching, especially on areas of the body that are covered with hair (typically the scalp, neck, and behind the ears). About 80% of head louse infections are amongst children aged 4-16 years. Head louse are mainly acquired by direct head-to-head contact with an infested person's hair, but may infrequently be transferred with shared combs, hats and other hair accessories. However, head louse cannot survive for long when away from the scalp and those found in clothing are usually dying.

Symptoms of Head Louse Infestation

The most common symptom of children infected with head louse is itching, although some children do not complain if they have a light infestation. Frequent itching can lead to the development of crusty sores on the child's scalp, which can be a sign of a secondary infection. Upon close inspection, the scalp may be red and irritated, and there may be linear abrasions from scratching. so to get rid of head louse you must try these home remedy for the treatment of head louse.

Home Prevention For Head Louse

  1. Keep eyes well protected while treating the hair. Use a rolled up towel to cover eyes on younger children.
  2. Wash all combs, brushes and headwear in hot water.
  3. Don't treat if there is a skin allergy or scalp infection. Consult your doctor if this is the case.

How to get rid of head louse - Home remedy for Head Louse.

Soak hair in olive oil. Leave this in overnight. Wash hair as normal to rid the oil. Next take plain white vinegar and rinse the hair with it. (undiluted) Wait for five minutes and rinse hair with tepid/warm water to remove vinegar. This dissolves the eggs. Repeat the vinegar rinse for four nights. On the fourth night check hair as you would with any other treatment. You may want to comb through the hair. Helps to get rid of head louse. One of the best home remedy head louse treatment.

Here are the home remedy for head louse treatment:

The remedies given below avoid the harmful chemicals and terrible smell of head louse shampoos and lotions available from pharmacies. Follow the steps given below.

2 ounces vegetable oil (e.g., olive oil)
20 drops tea tree essential oil (melaleuca)
10 drops rosemary essential oil
10 drops lavender essential oil
10 drops lemon essential oil (may be found in spice section of grocery store)

To use, combine the ingredients and perform a skin test. If no sensitivity is experienced, apply the mixture to dry hair. Cover hair with a shower cap or even a plastic bag, Leave the mixture on for 1-2 hours. Shampoo the hair 2-3 times to remove the oil.

A home remedy to prevent head louse infestation can be made by infusing juniper berries in a bottle of cider vinegar, Rub a solution of baby oil (or any mineral oil) and vinegar in equal proportions on the scalp and apply on hair thoroughly. Cover the head with a shower cap for 1 hour, then wash with normal shampoo. Another alternative is Tea Tree Oil, to get rid od head louse.

Treating head louse by Vaseline at home

Put the vaseline on hair apply cap, leave on overnight. The next morning apply peanut butter to get the vaseline out. All head lose and eggs will come out. It suffocates them, and the eggs cant stay attached,but note that it will be very difficult to wash off the Vaseline. It may need about 6 washes. You may rub some corn flour or plain flour into the hair before washing the hair. Helps to get rid of head louse.

Treating Head louse by home remedy with mayonanaise

Apply mayonanaise throughout hair and scalp, leave in for about 1 hour, this suffocates the live lice. Rinse clean and take a fine toothed comb to get all the nits out, section by section. wash and condition hair. One of the best home remedy head louse treatment.

Home remedy or treatment for head louse by Camphophenec

Take some straight Camphophenec, pour onto head & make sure you massage into scalp & into the hot spots.. Then cover with a plastic shower cap, leave in overnight. Next morning, if there are any bugs they will be in the cap.. Wash hair, then leave a thin coating of hair conditioner around the scalp. Hair will be very soft and you can repeat if necessary.

Shaving Cream is another Home remedy or treatment for head louse

Rub shaving cream on the scalp and apply a thick foam coating on hair for half an hour. The chemicals in the cream will kill the lice and eggs.

All above are the best head louse treatment or remedy for the treating head louse, to get rid od head louse. The head louse may not be killed immediately. One of above home remedy or treatment does not kill all the eggs, you may need to reapply 2-3 times.

Hair Stripping


Hair strippers are chemical treatments which are intended to strip out artificial color pigment with less risk or damage to the hair. The chemicals used are called reducing agents.

However, the action of stripping inevitably leads to weakening of the hair structure however ideal the condition prevailing, no matter what chemicals are used. Furthermore, hair stripping rarely proceeds evenly; resistant red pigments may be left' behing to give unsightly streaks in the hair shaft.

The action of a stripper is to break up the red pigments into small colorless particles. These fragments can then be easily rinsed out through the cuticle. The alkaline content of the stripper causes the cuticle to swell even more than when the hair was being tinted. The alkali opens the keratin chain the weakens the bonds holding the tint pigment to the hair protein.

Because the hair has been excessively softened during this process, it is essential that a thorough rinsing be carried out to remove all traces of the stripper. After rinsing, it is vital that the hair be reconditioned. The acid content of the conditioning cream will restore some of the body to the hair and will make it easier to manage giving the set more holding power.

Alkali strippers leave the hair in a very dry state. Although creams are included in the stripper itself, they only help prevent excessive hair damage and not really condition the hair. Mere ringing of the stripper will not bring the hair back to its normal acid Ph on reform the bonds in the cortex broken by the alkali.

Certain 'metal' strippers containing sodium sulphoites are sold for reducing hair dyed with metallic dyes, as these dyes react violently with tint stripper containing hydrogen peroxide-the subsequent reaction may cause so much heat that the hair gets dissolved.

Often grey hair treated with the so called hair restorers contain metal salts or often lead sulphide which darkens the hair. With this dyed hair, even metal strippers are not effective. In fact, the only real way to remove metallic dyes is to cut off that portion of the hair strand as soon as sufficient growth has taken place.

Hair Cutting Tools


You must not compromise on the quality of the implements you use; working with imperfect tools can give unpleasant results. So, look out for good, branded ones.

Improper use of superior implements too can produce unpleasant resu1ts, however perfectly they might be made at any reliable factory.

1) Scissors

This is the most important tool in haircutting. Both blades should be equally balanced, smooth, and sharp at the tip and the edges.

The correct way to handle scissors is by inserting the ring finger into the ring of the still blade, and placing the little finger on the finger brace. The thumb is inserted into the ring of the movable blade and the index finger is placed on the pivot of the still blade in order to have better control.

2) Section Clips

They are used to take out sections and clipping the hair out of the way while cutting.

3) Combs

Cutting combs are less wide and have narrow spaces on one end and wider spaces on the other. The thumb and index finger are used to hold the comb. While combing, the blades of the scissors are closed, and the thumb is removed from the ring.

4) Thinning Scissors

These tools have single or double-thinning blades, depending on the amount of thinning required. They are quite similar to hair-cutting scissors and are held in the same way, except that they have one or both blades serrated.

5) Razors

Basiclly, there are two types of razors:

(a) One that is used to clean men's neck hair and give a neat hairline and side bums.

(b) The other type of razor is used for tapering hair ends in a layer cut.

It is held by placing three fingers over the shank, the thumb in the groove of the shank and the little finger in the hollow part of the tang.

6) Clippers

These are useful for cleaning the nape area and cutting short hair.can be fitted with a nozzle for concentrated heat or with a diffuser to prevent hair from being blown away. These professional dryers have hot and cool settings to provide maximum comfort to the scalp and long-lasting hair sets.

8) Apron

This is used to protect you and your clothes.

9) Water Spray Bottle

This is used for wetting hair.

10) Nape Brush

This is used to apply talcum powder and clean away hair that has been cut.

11) Brushes

These are naturally bristled and are used to untangle and set hair in shape. They can also be used on the scalp in a rolling movement to loosen dead cells and debris

Hair Straightening


Just like people go into great lengths to get their hair permed due to various reasons, similarly people with naturally curly hair go into great lengths to get their hair straightened. Amazingly on some faces, straight hair appear lifeless and on some faces, curly hair looks ugly and untidy. Therefore, straightening is equally well practiced as permanent waving. The common link between the two changes is their chemical involvement.

The practice of hair straightening involves two major steps:

  • It breaks the S (Sulphur) bonds and the N (Nitrogen) bonds in the cortex during the processing time which softens the hair.
  • The use of neutralizer works as a fixative which is necessary to restore the N and S bonds to rejoin the hair and make the hair acquire the desired straightness.

Due to the chemical involvement, the hair may get damaged. To avoid that, the first step should be to analyses the hair texture accurately.

The chemicals should never be allowed to penetrate the scalp. Therefore, it should be understood that the new growth at the scalp would acquire the original curly nature. Since the maximum hair growth in a month is of about 3/4 of an inch, you needs to do hair straightened again. Straightening is the reverse of permanent waving, that means, in this process, you make the curly hair straight by using chemical straighteners. We should be very careful while using these chemicals because sometimes it goes wrong and the client may start losing hair, so always consult your client before you start.

Points to remember before hair straightening

  1. Texture of the hair.
  2. Length of the hair.

Procedure of hair straightening

  1. Shampoo the hair; conditioner can be used if the hair is chemically treated or damaged.
  2. Make straightening gel by mixing white flour (maida), perm lotion and conditioner to avoid dryness.
  3. Start from the back by taking horizontal sections.
  4. Make sure that the hair is tangle free and neat before you start putting the file board.
  5. Heavier the hair, smaller should be the section.
  6. Put gel on the board and comb it through. Gel should not touch the scalp.
  7. Leave the gel on for 10 to 40 minutes depending on the texture. Rinse it well by using pressure water for 10 to 40 minutes.
  8. The board will come out automatically with the pressure of the water.
  9. After rinsing, comb the hair straight and leave it for 10 to 15 minutes.
  10. Put the neutralizer on the hair for 10 to 15 minutes.
  11. Rinse the neutralizer; use conditioner and comb it.
  12. Always go for a cut after straightening to make the hair even. Always cut the hair at 0° angle to avoid layers. Straight cut is recommended for a much neater and healthier look.

This straightening procedure is safe on the hair as there is no pulling.

Post care for hair straightening

  1. Have a cut once a month or once in two months.
  2. Have a hot oil treatment done once a month.
  3. Use a serum is a must to avoid split ends and to provide shine to the hair.

Herbal Hair Rinse


Hair rinses are simple and quick to make and they are effective in restoring the hair's natural PH balance. Hair rinse are also clarifying and remove and last traces of shampoo or conditioner residue that may remain on the hair shaft. This helps make the hair shine. Use a hair rinse once a week after shampooing and using conditioner and make sure you rinse it off thoroughly with a lot of cool or tepid water.

Here Some Homemade Hair Rinse Recipe.

  • Apple Cider Vinegar Hair Rinse Recipe.

Cider vinegar has been used as a hair rinse since the time of our grandmothers and here apple cider vinegar is used as the base ingredients. Combined with the fresh aroma of orange flower water and petit grain, this makes a stimulating, clarifying hair rinse. Apple cider vinegar hair rinse is suitable for all hair types, though it works especially well on greasy hair.

Ingredients For Apple Cider Vinegar Hair Rinse.

1 tsp (5ml) apple cider vinegar, 1 tb sp (10ml) orange flower water, 1 tb sp (10ml) spring water, 3 drops petit grain, 1 drop bergamot.

Preparation For Apple Cider Vinegar Hair Rinse.

  1. Measure the apple cider vinegar into a glass bottle. Add the orange flower water and the spring water. Shake well to combine.
  2. Carefully add the essential oils, one by one, and shake well to disperse them.
  3. The hair rinse is ready to use. Slowly pour through your freshly shampooed and conditioned hair. Leave on hair for a couple of mintues.
  4. Rinse your hair thoroughly with cool or tepid water
  • Lemon and Rosemary Hair Rinse Recipe

This hair rinse recipe uses herbs and lemons - you can easily find fresh organic herbs and citrus fruits. The recipe suggests using rosemary, which is the best for dark hair. If you have light hair, substitute chamomile for the rosemary. Parsley is another alternative, and gives your hair a really clean shine.

Ingredients For Lemon Rosemary Hair Rinse.

The juice of one freshly squeezed lemon 1 tsp (5 gm) fresh, finely chopped rosemary, chamomile, or parsley, enough water to cover the herbs in a small saucepan.

Preparation For Lemon Rosemary Hair Rinse.

  1. Squeeze the lemon juice into a glass jug. Put the finely chopped herbs into a saucepan and pour in enough water to cover. Bring to the boil and simmer for five mintues.
  2. Strain the mixture through muslin and let the herb infusion cool. Mix 2 tb sp (20ml) of the herbal infusion into the lemon juice.
  3. The hair rinse is now ready to use. Slowly pour through your freshly shampooed and conditioned hair. Leave on the hair for a couple of mintues.
  4. Rinse your hair thoroughly with cool or tepid water.

The above homemade hair rinse in best for all types of hair. The above hair rinse helps in hair shine.

Homemade Hair Conditioner


Article Description: Simple homemade hair conditioner for you to make from our beauty recipe collection.

Provided by: Bestincosmetics.com

After shampooing, it's important to use hair conditioner to give increased manageability to your hair, leaving it soft and shiny. Conditioners restore vitality and luster and should be used every time you wash your hair.

The following conditioners use essential oils to perfume, balance and nourish your hair. These homemade conditioners make the perfect complement to your homemade shampoos.

Some natural homemade hair conditioner recipe.

Oat milk Conditioner with Mimosa and Ylang Ylang

This luxuriant conditioner has a sweet, exotic and floral fragrance and leaves your hair shiny, soft and manageable. Oat milk conditioner is especially for dry, damaged and colored hair but is suitable for all hair types.

Ingredients in homemade oat milk hair conditioner

5 tb sp (75ml) conditioner base, 2tbsp (25ml)oat plant milk, 10 drops ylang ylang, 10 drops lavender, 5 drops petigrain, 5 drops mimosa.

Preparation of homemade oat milk hair conditioner

  1. Pour the conditioner base into a glass container with a good pouring spout. Add the oat plant milk and stir thoroughly to combine the all the ingredients.
  2. Carefully add the essential oils, one by one. Use a glass stirring rod or a chopstick to thoroughly stir in the oils.
  3. Pour into a glass bottle, plastic squeeze bottle using a funnel to avoid spillage.
  4. Label the bottle and the oat milk hair conditioner is ready to use.

Herbal Hair conditioner with clary sage and rosewood.

Herbs and rosewood combine to make a hair conditioner that restores a healthy shine and a fresh, clean smell to your hair.This hair conditioner actively reduces excessive sebum production, which means your hair stays clean longer.

Ingredients in homemade herbal hair conditioner

6 tb sp (100ml) conditioner base, 10 drops clary sage, 10 drops rosewood, 5 drops rosemary, 3 drops lavender, 2 drops tea tree

Preparation of homemade herbal hair conditioner

  1. Pour the conditioner base into a glass container with a good pouring spout.
  2. Carefully add the essential oils, one by one. Use a glass stirring rod or a chopstick to thoroughly stir in the oils.
  3. Pour into a glass bottle, plastic squeeze bottle using a funnel to avoid spillage.
  4. Label the bottle and the herbal hair conditioner is ready to use.

Homemade hair conditioner by some fruits , vegetables and even nourishing food are miraculous hair conditioners if used in the right way.

Avocado is best homemade hair conditioner

Chop and put the fruit in the blender. Mix 2 eggs yolks in this pulp. Massage well into hair. Rinse with a mixture of lime juice and vinegar.

Mayonnaise gives you simple homemade hair conditioner

Food for hair! Heat half cup of mayonnaise. Apply to dry, unwashed hair. Leave it on for half an hour. Rinse, then shampoo. Gives super results.

Saffron is natural homemade hair conditioner

Boil saffron strands in the water. Cool it. Add to it the lime and one tablespoon of honey. Rub into scalp and hair strands. Leave it on for 15 minutes. Rinse thoroughly with the water. Your hair acquires a golden sheen.

All above homemade hair conditioner are natural and herbal for use.

Hair Care and Tips


Eventually I knew precisely what hair wanted:it to grow, to be it self...
to be left alone by anyone, including me , who did not love it as it was .

Beautiful, shining hair is a valuable asset. It can also be a versatile fashion accessory, to be colored, curled, dressed up or smoothed down. Your hair plays a big factor in determining how you look and perceive yourself. There are no secrets to beautiful hair! With a great cut and style, you'll feel like a million bucks.

Proper hair care shows from the top of your head, so you want to be on top of your hair. The importance of well cared for hair can be found in the careful selection of hair care products. Hair care requires patience along with gentle hair care products and a hair cut every few months. Hair color is a wonderful option for creating a new look for yourself and hair care products are becoming less harmful to your hair care.

You don't have to spend hours on your hairstyles. Here's enough home hair care tips and tricks to deal with problem hair that won't cooperate even on the best of days -- and keep it healthy & shiny.

Basic Hair Care Tips For

DRY HAIR

Increase intake of low cholesterol, polyunsaturated oils such as margarine, sunflower oil, fruits and foods rich in Vitamin B.
Eat: Foods rich in vitamin B, raw vegetables, pulses, wholemeal bread, brown rice, liver, bananas, nuts and oily fish. A supplement of Vitamin E capsules will also help.
Avoid: Salty and fatty cheeses.

NORMAL HAIR

Eat: Low fat fish, chicken, pulses like dals and sprouts.

MIXED-CONDITION HAIR

Eat: Plenty of vegetables and fresh fruits.
Avoid: Butter, cheese and deep fried foods.

DULL HAIR

Eat: Foods rich in minerals - green vegetables, nuts, lentils, whole grain cereals, shrimps, oily fish and milk.

OILY HAIR

This condition stems from over secretion of the sebaceous glands.
Eat: Lots of green leafy vegetables, salads, fresh fruits, yogurt, baked and grilled dishes.
Avoid: Fried and greasy foods, milk products and red meat.

Daily Hair care tips and advice

  1. Use a shampoo that is pH balanced and that is formulated for your hair type. Conditioner should be nourishing but not heavy. Rinse with cool water for extra shine.
  2. Avoid excessive blow drying and air dry hair whenever possible. This will help prevent split ends and drying.
  3. Massage the scalp with the oil regularly to encourage oil production.
  4. After swimming, wash your hair with fresh water as soon as possible to remove chlorine residue.
  5. Never brush wet hair, which can lead to breakage; instead, use a wide tooth comb after you shampoo and save the brush for later.

FACT FILE OF HAIR

  • Hair grows about 12 mm per month.
  • A single strand lives for up to seven years.
  • If a person never had their hair cut it would grow to a length of about 107 cm/42 in before falling out.
  • Women have more hair than men.
  • Hair grows faster in the summer and during sleep.
  • Hair grows faster between the ages of 16 and 24.
  • Between the ages of 40 and 50 wsomen tend to lose about 20 per cent cot their hair
  • Hair becomes drier with age. Hair, which reacts to hormonal stimuli just like the hair on the rest of the body, is genetically programmed to repeat its growth cycle 24-25 times during the average person's lifetime.

Finger Drying


This is a quick method of drying and styling your hair. It relies on the heat released from your hands rather than the heat from a dryer. Finger drying is suitable for short to mid-length hair.

  1. Shampoo and condition your hair, then spray with gel and comb through.
  2. Run your fingers rapidly upwards and forwards, from the roots to the ends.
  3. Lift up the hair at the crown to get height at the roots.
  4. Continue lifting as the hair dries. Use your fingertips to flatten the hair at the sides.

Tip :- Finger-drying is the best way to dry damaged hair, or to encourage waves in naturally curly, short hair.

STYLING CHECKLIST

You will need :-

  • Spray gel.
  • Styling comb.

Dry Hair Tips


Dry hair looks like unwashed straw. It grows thicker nearer the scalp and thins out towards the ends, thus causing split ends.This hair is caused by heat and the elements, so the first step is prevention: Avoid using overly hot dryers and heat-styling implements and wear a hat or scarf if you're going to be exposed to sun or wind for long periods (at the beach or skiing, for instance). Don't wash your hair every day - unless you have an oily scalp.

Atmospheric pollution too tends to have a drying effect on the hair. Such hair needs extra care. When you wash your hair, use shampoos and conditioners that contain humectants. Leave the conditioner on your hair as long as possible. About once a week, do a deep- conditioning treatment.

There are several simple home remedy for dry hair.

WARM OIL MASSAGE cure dry hair

This is nothing as nourishing as a warm oil massage. Take half a cup of coconut oil. Crush 4 almonds and add to oil. Steam this mixture by placing it inside a pan. Apply while still warm, deep into the scalp and into roots of your hair. Cover your head with a towel and leave it on for half an hour. Shampoo your hair.

BANANA NOURISHING PACK is dry hair treatment

Mash two ripe bananas. Add half cup beaten curd. Apply this paste all over your scalp and coat the ends of the hair with it. Pile up your hair high over your head. Leave it on for 15 mintues and then shampoo as usual. You will immediately notice a dramatic change in the texture of your hair.

EGG TONIC will retain dry hair vitamin

Beat up an egg in a cup of milk. Squeeze in the juice of the one lemon. Add to this a teaspoon of the coconut oil or olive oil massage well into your hair. Cover with moist, warm towel. Leave it on for an hour. Rinse it thoroughly. The final rinse should be with lime juice and warm. A good alternative would be to add yogurt instead of the milk.

Rid of Dandruff


There is a misconception that dandruff is caused by dry scalp. In fact it is due to an oily scalp. Wrong dietary habits like excessive consumption of cheese and chocolates also cause oil to accumulate on the scalp and cause dandruff. Worry and tension increases the flow of oil in the scalp, make you prone to dandruff. These white flakes can be a nightmare. Dandruff further tends to weaken the scalp, and the flakes falling on your face, neck and shoulders can affect your skin skin too.

Severe dandruff may be the result of psoriasis of the scalp. Seborrheic dermatitis may be caused by an increased number of a yeast-like organism (pityrosporum ovale) found on healthy scalp in low numbers. Dandruff can occur to anybody at any age. It should not be left untreated.

Here some natural home remedy for dandruff to get rid of dandruff

For good hair without dandruff, drink at least 2 liter water. Combs must be washed and hair should be brushed regularly. Dandruff is a scalp condition that can be controlled by following home remedy methods.

Warm Oil Treatment is best to get rid of dandruff

Warm 4-5 tablespoons full of wheat germ oil, olive oil or coconut oil. Massage well into the scalp. Wrap a warm towel around your head. Leave it on for 30 minutes. Rinse your hair thoroughly with water, to which lemon juice has been added. Massage well as you rinse. This is the most commonly known cure for dandruff. This will helps to get rid of dandruff.

Chickpea Flour (Besan) and Curd is natural dandruff remedy

Take half a cup of chickpea flour. Add to this a little curd and enough water to make a thick paste. Apply on the scalp and individual strands of hair. Leave it on for 30 minutes. Rinse vigorously with warm water.

Rosemary and Oil Treatment is another treatment for dandruff rid

Take half a cup of coconut or olive oil. Add a few drops of rosemary oil, (alternatively, crush some fresh strain the oil by squeezing the leaves.) Apply all over the scalp. Leave it on all night after wrapping up your head with a towel. In the morning, rinse your hair with a mixture of warm water and lemon juice.

Fenugreek (Methi) Seeds and Oil for get rid to dandruff

Crush a tablespoon of fenugreek seeds in about 5 tablespoons of warm coconut or olive oil. It would be better to boil them in the oil. Cool the mixture and apply generously all over the scalp. Leave it on for two hours. Rinse and wash off. This will helps to get rid of dandruff.

Soap Nut (Reetha) is natural dandruff treatment

This is ideal for removing dandruff. Soak half cup soap nut overnight in one cup of warm water. Extract the juice from the soap nut br rubbing them vigorously. Strain. Apply directly on the scalp. Leaves this on for 15 minutes. Rinse and wash your hair with tepid water. Shut your eyes tightly while rinsing as it hurts the eyes. Ensure that no residue is left behind.

Onion is natural dandruff solution

Grind raw onions to fine paste. Rub this paste into your scalp. Leave it on for an half hour. Wash thoroughly. Rub in some lemon juice into your scalp and hair to rid your self of the onion smell.This will helps to get rid of dandruff.

Black Pepper is a natural dandruff home made remedy

Take 10 grams of black pepper powder. Add to it the juice of a fresh lime, along with a quarter cup of milk. Rub this mixture thoroughly into your scalp. Leave it on for an hour and wash it out thoroughly with the water.

Conditioning Treatment


This is mainly a deeper conditioning treatment that softens the hair quickly. You can do it tackle the following conditions:

  1. Very dry hair due to dry scalp conditions.
  2. A week after the use of any kind of hair dye or tint.
  3. Roughness due to permanent wave treatment.
  4. Dryness caused by hair straightening treatment.
  5. Roughness caused by mishandling of the hair such as excessive use of dryer and too much back combing.
  6. Swollen (Knotted) hair.
The purpose of a corrective conditioning treatment is to nourish and condition the hair shaft. The condition, whether chemical or herbal, should be protein rich to work effectively on the hair.

Corrective Conditioning Procedure

  1. Brush hair for 5 minutes to stimulate the scalp and clear dust and dirt from hair.
  2. A protein conditioner should be applied now.
  3. (Protein conditioner ingredients: Castor oil 1-2 teaspoon malt vinegar, olive oil - 1 teaspoon. 2 full eggs or more according to hair length. Mix all the items and apply thoroughly while parting hair in small sections).
  4. Heat is applied to the head by using heating cap or a scalp steamer to give uniform heat or wrap your head in a hot towel for half an hour.
  5. Reheat the towel if it gets cold. Heat will activate the absorption of the conditioning elements into the hair-much faster.
  6. Use mild shampoo to wash hair.
  7. Towel dry hair to remove excess moisture.
  8. Dry and style hair.

(Note: If a chemical commercial conditioner is used, manufacturer's instructions should be followed.)

Blow Drying Hair


  1. Shampoo and condition your hair.
  2. Comb through with a wide toothed comb to remove any tangles.
  3. Partially dry your hair to remove excess moisture.
  4. Apply a handful of mousse to the palm of your hand.
  5. Using your other hand, spread the mousse through the hair, distributing it evenly from the tips to the ends.
  6. Divide your hair into two main section by clipping the top and sides out of the way. Then, working on the hair that is left free and taking one small section at a time, hold the dryer in one hand a styingg brush in the other. Place the brush underneath the first section of the hair, positioning it at the roots. Keeping the tension on the hair taut (but without undue stress), move the brush down towards the ends, directing the air flow from the dryer so that it follows the downwards movement of the brush.
  7. Curve the brush under at the ends to achieve a slight bend. Concentrate on drying the root area first, repeatedly introducing the brush to the roots once it has moved down the length of the hair. Continue the movement until the first section of the hair is dry. Repeat step 6 until the whole of the back section of hair is completely dry.
  8. Release a section of hair from the top and dry it in the same manner. Continue in this way until you have dired all your hair. Finish by smoothing a few drops of serum through the hair to flattern any flyaway ends.

Blow drying and styling time will vary based on your hair texture, thickness and length.

Tips : -

  • Use the highest heat or speed setting to remove excess moisture, then switch to medium to finish drying.
  • Point the air flow dowmwards. This smoothes the cuticles and makes the hair shine.
  • When blow drying, make sure each section is completely dry before going on to the next.

What You Need : -

  • A blow dryer - For Blow Drying Hair
  • Styling hair brush
  • Serum
  • Styling hair comb
  • Mousse

Cure Baldness

Baldness, also known as alopecia, is hair loss, or absence of hair. Baldness is usually most noticeable on the scalp, but can occur anywhere on the body where hair grows. The condition is more common in men than in women.

Causes of Baldness

The most important cause of loss of hair is inadequate nutrition. Even a partial lack of almost any nutrient may cause hair to fall. Some of the common causes of Baldness are :-

  • Aging.
  • Family history of baldness.
  • Stress such as worry, anxiety.
  • Iron deficiency.
  • Exposure to chemicals such as those used to purify swimming pools, bleach, dye, and perm hair.
  • Skin disease.

Natural Home Remedies To Cure Baldness

Several natural home remedies have been found useful in the prevention and treatment of the Baldness are :-

  • Grind 1/2 lime seeds, and 1/2 black pepper, apply to bald patches regularly. Helpful home remedy to cure baldness.
  • Daily application of refined coconut oil mixed with limewater and lime juice on the hair, prevents loss of hair and lengthens them. Application of the juice of green coriander leaves on the head is also considered beneficial. Amaranth, known as chaulai-ka-saag in the vernacular, is another valuable remedy.
  • Rinse hair with a mix of apple cider vinegar and sage tea to help hair grow.
  • Drink a smoothie of banana, honey, yogurt, and skim milk.
  • Rub on the scalp with 1 teaspoon oil in which raw mangoes have been preserved for over one year. Repeat treatment frequently.
  • Grind lime seeds and black pepper in equal number in some water and apply on the scalp regularly. Helps to cure baldness
  • Boil 1 cup mustard oil with 4 tablespoon henna leaves. Filter and bottle. Massage on the scalp regularly.
  • Another useful natural remedy for patchy loss of hair is the paste of liquorices (mulethi) made by grinding the pieces in milk with a pinch of saffron. This paste should be applied over the bald patches in the night before going to bed.

Get rid of Dark Circle


This is a common problem which is caused by lack of sleep, fatigue, dietary deficiency or disease. It is generally easy to spot people with chronic insomnia by the tell-tale circles around the eyes. Sleep is very essential to both health and beauty . So is a nutritious balanced diet . If you suffer from insomnia or chronic fatigue, you should consult your doctor. Along with medical help , you should low a daily rout line of external care.

The eyelids are already the thinnest, softest areas of skin in the body. Normal skin is around 2 millimeters thick, but eyelid skin is only 0.5 millimeters thick.

Cause of dark circles under eyes or around eyes

1. Lack of sleep.
2. Inherited condition having a family with the kind of skin that makes dark circles more likely.
3. Fluid retention which causes puffiness that may cast shadows.
4. Aging which thins and relaxes the skin around the eyes.

How To Get Rid of Dark circles under eyes or around eyes - Treatments and Remedies

  1. CUCUMBER : Clean your face of all make up. Cut thin slices of cucumber. Chill them. Now lie down and shut your eyes. Apply chilled cucumber slices over your eyes and under eye area and relax. Leave it on for 15 mintues. Gently rub the slices over and under eye area, and then wash off. You will feel relaxed and refreshed. The natural moisture from the cucumber acts as a healing tonic, while the cucumber juice helps to lighten the skin too. A great for tired and puffy eyes. Helps to get rid of dark circles under eyes or around eyes.
  2. ICE CUBES : When you get in from the hot sun eyes tired and bloodshot. You also develop dark circles and shadows due to heat and pollution. Try this : wash your face. Take some ice cubes and wrap them in two pieces of muslin. Lie down and shut your eyes. Place one ice cube pack over each eye, rubbing gently. This will immediately ease the 'burnt up' skin feeling. Regular use helps to lighten the dark circles under the eyes or to get rid of dark circles under eyes or around eyes.
  3. GREEN GOURD : You could similarly use slices of green gourd instead of cucumber. The juice of the green gourd also helps in lightly moisturizing as well as lightening the skin tones. Regular use helps to lighten the dark circles under the eyes and remove dark circle under or around the eyes.

Tips on dark circles around or under the eyes

1. Get enough sleep. Try to go to bed a little earlier than normal.

2. Cucumber slices have a soothing effect on the eyes.

3. Use sunscreen every day and moisturize in the night preferably using a good under eye cream.

4. Drink plenty of water to hydrate the skin.

5. Apply cold compresses.

6. Eat fresh fruits and vegetables. Iron deficiency can be a cause for dark circles around the eyes.

Using concealer to hide the Dark under eye circles

The fastest cure for dark circles is to apply concealer. Choose a gold-based color that matches your skin shade exactly (the gold will counteract the blue of the under eye circle).

The most common mistake women make when applying concealer is choosing a color that's too light -- this only achieves a "reverse raccoon" effect. Another common problem: putting the concealer only under the eye. You should apply it all around the eye area, and be sure to blend well. Set the concealer with a light dusting of translucent face powder so that it stays put. And to avoid drawing attention to your under eye area, don't apply eyeliner or mascara to your lower lashes.

Often, the inner corner of the eye is the darkest part. A white shimmer pencil will cover it. Some companies manufacture a blueish or white pencil just for this purpose.

Severe and Chronic Chapped Lips Treatment


Severe and chronic chapped lips are a result of very dry skin on the lips. Dry skin occurs when the moisture, or water, content of the skin is decreased for any reason.The skin on our lips is actually mucous membrane, so for them to remain smooth and chap free is a bit of a challenge.

Causes of chapped lips

Common cause of severe and chronic chapped lip are allergic reaction to cosmetics, skin infections, extreme weather conditions like excess sun and wind exposure, biting of the lips or a vitamin B deficiency. If dryness, cracking or soreness of the lip has already developed, it is especially important to use a medicated product to provide relief. Use a lip care product as part of a daily regimen to Daily treatment of the lip helps maintain a smooth feel and appearance, moisturize your lips and maintain their healthy condition. Some of the common causes of chapped lips are :

  • A lack of essential fatty acids and/or B vitamins, poor diet and dehydration.
  • Allergic reaction to cosmetics like lipsticks, lip gloss.
  • Extreme weather conditions like excess sun and wind exposure.

A product with a penetrating analgesic can soothe the lip quickly and effectively. Massage dry lip with lip balm or petroleum jelly. You can also try coating your lip with skin moisturizer, vitamin E oil or aloe vera gel. These greasy products help keep your lip properly moisturized.

What are the symptoms of severe and chronic Chapped Lips:-

When the Lip are severe and chronic chapped they usually have the following qualities roughness, dryness, redness, peeling, cracking, sensitivity and tenderness.

Here are some simple home steps to Cure Severe and chronic Chapped Lips:

  1. Avoid going out in dry, cold weather without putting on lip balm or lipstick.
  2. Keep lips soft by not licking them.
  3. Try to keep the air in your home humid.
  4. Use a sunscreen on your lips when outside in sunny weather.
    Avoid excessive sun exposure.
  5. Eat plenty of fruits and vegetables.
  6. Drink plenty of water to prevent dehydration.
  7. Take vitamin B, C foods in diet.
  8. Hot water fomentation, followed by a mixture of Vaseline and honey applied on the lips at least thrice a week will prevent lips from chapping.
  9. Give dry, flaky lip the brush-off; Once a week exfoliate your lip. Wet a soft toothbrush and gently brush your lip with a circular motion.
  10. When participating in outdoor activity, use a lip balm that contains a sun block to prevent sunburn.
  11. If lip become chapped, avoid wearing lipsticks while lip are recovering as drying products in color pigments may irritate chapped lip.

Home made Remedies to Cure the Severe Chapped Lips

With Glycerine and Milk Cream you can cure severe and chronic chapped dry lips

  1. Mix 2 drops of glycerine with 1 tsp of cream on the top of milk and apply to lip to cure the chapped lip and keep overnight to get smooth and shiny lip. Helps to cure dry chapped lip.
  2. Grind rose petals with cream on the top of milk and apply on lip to cure the severe and chronic chapped lip. Helps to cure severe and chronic chapped lip.

Mentholatum are the remedy for severe chapped lips

Before you go to bed at night rub some Mentholatum on your chapped lip. Use as much as you would if you were applying chap stick. When you wake in the morning the dryness is gone. Works especially well with cracked and severe chapped lip.This remedy leaves your lip soft and supple.

Petroleum jelly is the best Home Remedy to cure the severe and chronic Chapped Lips

Apply petroleum jelly to your lips 3-5 times a day. The great part is that it's clear and thin, so it looks great over your lipstick because it's shiny! Try it! It helps in great deal to cure the severe and chronic chapped lips.

Unsalted Butter to cure the Severe and Chronic Chapped lips

Rub melted unsalted butter on your lip. Yummy! Just doing this once or twice weekly can prevent chapped lip. During extreme winters, apply vaseline at nights and carry a chap stick for use when needed. This will help to cure from the severe and chronic chapped lips.

Olive Oil is another method to cure the Chronic Chapped lips

All you have to do is take a little bit of olive oil on the tip of your figure, and place on your chronic chapped lips as you would chap stick. You will have immediate results. Just apply when you feel you need it.

All above Homemade remedies are best to cure the chronic and severe chapped lip, you must follows the above home steps to cure the chronic and Severe Chapped Lip.

Get Rid of Blackheads


Blackheads are so common, yet many of us do not know what they are. We know even less about dealing with them. However, they can be controlled and even prevented by taking regular care of the skin. A blackheads results when dead skin cells and sebum block a hair follicle near the surface of the skin. blackheads causes the oily skin pores to be enlarged and the texture becomes coarse and rough. When a pore is fully blocked, a pimple can result and blackheads cause acne.

It is essential to keep the skin free of blackheads. Not only does it look unsightly, but, can lead to acne. The control of blackheads is one way of preventing acne.The counter part of the blackheads is the whitehead, which is also caused by collection of sebum in the pores, but in this case the pores are not open and the sebum is not exposed to the air.
Daily cleansing of the skin, with products that reduce surface oil and also keep the pores free of blackheads, is absolutely essential. The use of the specialized masks would also help. After cleansing and toning the skin, use oiliness protects cream.This protects the skin from the effects of pollutants.

Blackheads extraction is a professional job. Never pick at them, or try to remove them yourself. Not only will you damage skin tissue, but cause the skin to get infected, resulting in an acne condition.

Remove blackheads and whiteheads with a blackheads extractor while pressing the skin gently. Now wipe your face with an astringent lotion to close the pores.

Blackheads won't magically go away when you reach twenty-one, but proper cleansing techniques can get rid of blackheads, Regardless of your age. It's all in how you care for your skin, it really is. Drink plenty of water and fresh fruits and fruit juices. Keep the skin clean by washing it with plain water. Wash the face with a medicated soap using warm water.

Here are effective home remedy to get rid of blackheads removal.

  1. Black pepper and curd are best for blackheads removal :Take one tablespoon black pepper powder and add to it enough curd to make thick paste. Apply on the infected area and let it dry. Wash off after 5-7 minutes. This is an effective cure for blackheads or to get rid of blackheads.
  2. Oatmeal and Yoghurt : Take 2 tablespoons of oatmeal and 3 tablespoon of yoghurt. Mix and add tablespoon of lemon juice and one teaspoon of olive oil. Blend and whisk well together in a bowl. Wash your hands then apply over infected area first, then all over the face. Leave in for 5-7 minutes and then rinse with cold water. Very effective for blackheads or to get rid of blackheads.
  3. Mix Cornstarch With Vinegar, make a paste and apply on the area for 15-30 minutes; wash off with washcloth and warm water, this helps to get rid blackheads
  4. Cucumber :Peel cucumber and place in blender. Blend until cucumber is of a pasty consistency, but not too watery. Take the mixture and apply as a face mask leaving it on face for 25 min's.This procedure not only clears the acne, blackheads but also cools down your face leaving you feeling refreshed. Helps to get rid blackheads

Try out these above home remedies for removing your blackheads yourself or get in touch with a qualified beautician.

Blackheads Removal - Some are Face pack for removing blackheads.

The Following packs can be used for normal skin for blackhead removal.

Fuller's Earth Pack - Dilute fuller's earth (multani mitti) with rose water. Helps to cure blackheads.

Calamine pack - Mix calamine powder and Kaoline powder in equal ratios and make a paste with rose water. Helps to get rid blackheads.

Sandalwood Pack - Mix sandalwood powder with rose water. Make a paste, now apply this paste on blackheads. Now let the paste to dry, now face it. This helps in removal of blackheads.

Grape Pack - Mash grapes finely to make a smooth pulp. Apply it directly on the face. Leave it on for 30 minutes and wash off with warm water. A grape pack is very effective in maintaining the acid balance of normal skin. This a effective cure for blackheads.


Acne & Blackheads Home Remedies


  • Please check if you have any allergies or sensitivity with some ingredients; such as glycerin, lemons, orange, garlic, papaya, eggs, etc.
  • Grind nutmeg with milk and apply on affected area. This works as a magic. Acne should disappear without leaving a mark.
  • Make a paste by mixing 3 tablespoons of honey and 1 teaspoon of cinnamon powder. Apply this paste on the acne before sleeping and wash it next morning with warm water. Repeat for two weeks, pimples will disappear forever.
  • Apply a mixture of 1 teaspoon lemon juice and 1 teaspoon cinnamon powder.
  • Make orange peel paste by grinding it in some water. Apply on and around acne.
  • Rub fresh garlic on and around acne. Acne will disappear without a mark with regular applications.
  • Mix 1 tsp's groundnut oil with 1 tsp fresh lime juice to prevent formation of blackheads and acne.
  • Apply fresh mint juice over the face every night for the treatment of pimples, insect stings, eczema, scabies, & other skin infections.
  • Ground drumstick pods and leaves and mix mixed with fresh lime juice, and apply on acne. This is also good for blackheads and dark spots.
  • Apply a paste of fresh methi (fenugreek) leaves over the face every night for 10-15 minutes and washed with warm water. This will prevent pimples, blackheads, and wrinkles.
  • Mix groundnut oil with an equal amount of fresh lime juice and apply on face. leave for 10-15 minutes and wash. It may be applied daily to prevent formation of blackheads and pimples.
  • Apply juice of raw papaya (including the skin and seed) on swelling acne.
  • Apply fresh lime juice mixed to a glass of boiled milk as a face wash for acne, blackheads, and cracked skin.
  • Mix lime juice and rose water in equal portions. Apply on affected area. Wash it off after 20-30 minutes with lukewarm water.
  • Apply ripe tomatoes pulp on pimples and kept up to 1 hour, then wash.
  • Make a paste of roasted & powdered pomegranate skin with fresh lime juice and apply over boils, acne, blackheads and whiteheads.
  • Apply grated potatoes as poultice to treat skin blemishes, wrinkles, boils, acne scar, blackheads, whiteheads , etc.
  • Make a paste of sandalwood with rose water. Apply on affected area. Wash it off after 20-30 minutes with lukewarm water.
  • Make a paste of ground radish seeds with water and apply on face to remove blackheads.
  • Apply a paste of ground seasame seeds with water as poultice for inflammation of the skin due to allergies, skin rashes, and acne scar.
  • Apply a paste of fresh fenugreek (methi) leaves in water over the face every night and washed with warm water in the morning for preventing acne scar, blackheads, whiteheads, dryness, and wrinkles.
  • Apply a decoction on the face, made by boiling 1 teaspoon fenugreek (dana methi, methi) seeds in 1 liter water for a few of minutes for preventing acne, blackheads, dryness, and wrinkles.
  • Make a paste of ground orange peel with water. Apply on affected area. Wash it off after 20-30 minutes with lukewarm water.
  • Make a paste of salt in vinegar. Rub it on the acne scar. Wash it off after 20-30 minutes with lukewarm water.
  • Make a paste of turmeric powder in mint juice. Apply on affected area. Wash it off after 20-30 minutes with lukewarm water.
  • Make a paste of neem leaves with turmeric powder. Apply on affected area. Wash it off after 20-30 minutes with lukewarm water.
Women get concerned if they have acne, pimples on their face. The situation may be caused by hormonal changes at puberty, wrong food habits and improper skin care.Use a natural antibacterial, non-oily face wash such as those containing tea tree oil or a clay mask containing echinacea. Don't use oily cosmetics. Zinc, Vitamin A, B & E, echinacea, thyme, and tea tree oil can cure acne. Do not use any facial cream or other products containing socetyl stearate, isopropyl isostearate, isopropyl palmitate, isopropyl myristate & sodium chloride. They can cause acne.

The Top Five Acne Don'ts Remove of Acne Scar, Pores

Following are excellent and wonderful home treatment of acne or pimple scars.
  1. Large pores on facial skin can be treated with paste of sandalwood (chandan) powder with black gram (masoor) dal. Keep it overnight and wash it with cold water the next day.
  2. This is an excellent and wonderful remedy to get rid of acne scars. Make a sandalwood paste with rose water and apply on the scars. Keep it overnight and wash it with cold water the next day.
  3. Rub ice cubes on the face for 10-15 minutes. It will tighten the pores.
  4. Apply cucumber juice on the face. Wash it off after 15 minutes. It will tighten the pores.
  5. Cut the tomato in half and rub on the skin. Leave on for fifteen minutes. Wash it off with water. This will reduce open pores and blackheads. This treatment is good particularly for oily skin.

Aussie Tea Tree Treatment For Remove Acne Scar

Tea tree oil is an elixer to the gods of the bush in rural Australia. Aboriginal people use it for practically everything related to skin, but because it's antiseptic , anagesic,and anti-inflammatory, it will send your pimples packing.

  1. Mix the tea tree oil into the milk or water.
  2. Swab on your face with cotton.
  3. Rinse off after 5 to 10 minutes.
    You can also use Q-tip to swab this mixture directly on blemishes.

Homemade Acne Treatment


Acne usally begins with blackheads. Acne is common in adolecence,when raging hormones stimulates the sebaceous glands and they become more active. But hormonal imbalances can also trigger acne well after a women passes through puberrty.

Acne or pimples may be caused by wrong food habits and improper skin care. Homemade beauty recipes like face-packs, facial masks, scrubs, hair care, dandruff care and body wraps based on herbs and natural ingredients help improve the skin disorders and detoxify. They help in providing natural oil and moisture to the skin<.

Paraffin Wax Treatment


The most exclusive spas charge top dollar for this foot-loving paraffin wax treatment.

1. Melt 4 bars of paraffin wax (available at grocery and hardware stores) in the microwave oven.

2. Massage in a rich moisturizer.

3. Dip one foot into warm paraffin 3 times, pausing between layers to allow them to dry.

4. Wrap each foot with plastic wrap tight enough to make an airtight seal. This will help the moisturizer to penetrate.

5. Let set for twenty minutes.

6. Remove wrap and peel off the wax.

HINT: Also use this treatment on hands.

Shea Cream


Shea Cream is a rich concoction made with liquid shea butter. Unlike typical shea butter, liquid shea butter is not solid at room temperature. Instead, it''s more the consistency of jojoba oil, and it makes an ultra-thick cream all its own. This Shea Cream is unscented for simplicity, but you can add a total of about 25 drops of essential or fragrance oil of your choice for scent.

Ingredients:

  • 26 grams liquid shea butter
  • 4 grams honey
  • 2 grams stearic acid
  • 60 grams distilled water
  • 1/4 teaspoon borax
  • 1/8 teaspoon xanthan gum

Blending Procedure:

  • Combine the liquid shea butter and stearic acid in a large heat proof (I use Pyrex) glass measuring cup with a pour spout. Place the mixture in a hot water bath until the stearic acid is completely melted. Remove from heat. Stir to combine the ingredients. Set aside.
  • In a separate Pyrex cup, combine the water, borax, honey and xanthan gum. Place the mixture in a hot water bath for about 10 minutes to warm, then stir until the borax and honey dissolves completely. Remove from heat.
  • Stir the oils/waxes together to make sure they are evenly combined.
  • In the separate container, stir the water ingredients to make sure they are evenly combined.
  • Begin stirring the oil/wax mixture with an electric mixer on medium speed and add the water mixture as you stir. You will see the mixture begin to thicken as you blend it. Continue mixing until until Hula Honey Cream is thick and rich. It should take about 5 minutes, maybe a little less, for the mixture to fully form. Pour into clean jars and allow to cool before capping and labeling.
  • The shelf life of this product is about 1 to 3 weeks without a preservative and unpreserved, will last the longest if kept refrigerated between uses. You can extend the shelf by adding the preservative of your choice.

Mouthwash


Using a scope and magic mouthwash daily helps keep your gums healthy and your breath smelling fresh. This daily ritual also helps prevent the build up of plaque on your teeth. Alongside the regular brushing of your teeth with toothpaste and flossing between the teeth, gargles and scope mouthwash form an essential part of your daily mouth hygienic routine.

Certain essential oils are very effective in keeping your gums in tip top condition. Myrrh is traditionally used in toothpaste and scope mouthwash as it quickly heals gum disorder and heals mouth ulcers. Fennel is also recommended for use in gargles and scope mouthwash as it helps clear gum infection and keeps the mouth smelling fresh and sweet. Alongside peppermint, fennel helps counteract the bitterness of myrrh.

As the following homemade mouthwash contain essential oils, like the scope mouthwash contains, remember to spit them out after rinsing your mouth.

Myrrh and Mint Mouthwash works as scope or like a magic mouthwash ones.

This mouthwash is especially effective if you are having trouble with your gums bleeding or tend to develop mouth ulcers. The action of the mouthwash is reinforced by using tincture of myrrh as a direct topical application. Put a drop or two of tincture of myrrh on your fingertip and rub over effective area. It will sting briefly and taste very bitter but the healing effect is well worth it, like the magic one.

Ingredients in Myrrh and Mint Mouthwash.

6 tb sp (90ml) high proof brandy or vodka, 10 drops myrrh, 10 drops peppermint, 2 drops lemon, 1 drop thyme.

Preparation of Myrrh and Mint Mouthwash.

  1. Pour the brandy or vodka into a 4 oz (100ml) glass bottle. Carefully add the essential oils one by one. Shake the bottle vigorously to dissolve the oils.
  2. Label the bottle and the mouthwash is ready to use. To make one dose of mouthwash, add two or three teaspoons of mouthwash to half a small glass of warm water and stir well.
  3. Now you can use your homemade mouthwash.

Fennel Fresh Mouthwash like a scope mouthwash.

The clean, fresh, herbal aroma of fennel is balanced with the fruity zing of grapefruit in this tangy mouthwash. Fennel also has a slight aniseed flavor, making it pleasant to use in a mouthwash as well as keeping your mouth and gums clean and healthy.

Ingredients in Fennel Fresh Mouthwash.

6 tb sp (90ml) high proof brandy or vodka, 10 drops fennel, 10 drops grapefruit, 2 drops thyme, 1 drop chamomile.

Preparation of Fennel Fresh Mouthwash.

  1. Pour the brandy or vodka into a 4 oz (100ml) glass bottle. Carefully add the essential oils one by one. Shake the bottle vigorously to dissolve the oils.
  2. Label the bottle and the mouthwash is ready to use. To make one dose of mouthwash, add two or three teaspoons of mouthwash to half a small glass of warm water and stir well.
  3. Now you can use your homemade mouthwash.

All above homemade mouthwash are good for your gum and teeth. These homemade mouthwash are prevent the teeth from gum disease and bad breath. They works like the scope or magic mouthwash works .

Related Posts Plugin for WordPress, Blogger...